DIY costume guide · Updated October 21, 2026
Buddy the Unicorn Costume: Movie Look, Original DIY and AI Try-On
Looking for a Buddy the Unicorn costume? Make your own haunted unicorn look with a lilac hoodie, a pearl-colored soft horn and a mint yarn mane. This is an original fan-inspired design, not an official costume or a replica of the movie character.
Preview the Costume Try-OnUpload a photo in the existing generator. AI previews suggest a look; they do not measure garment fit or guarantee the same materials, pose or finish.
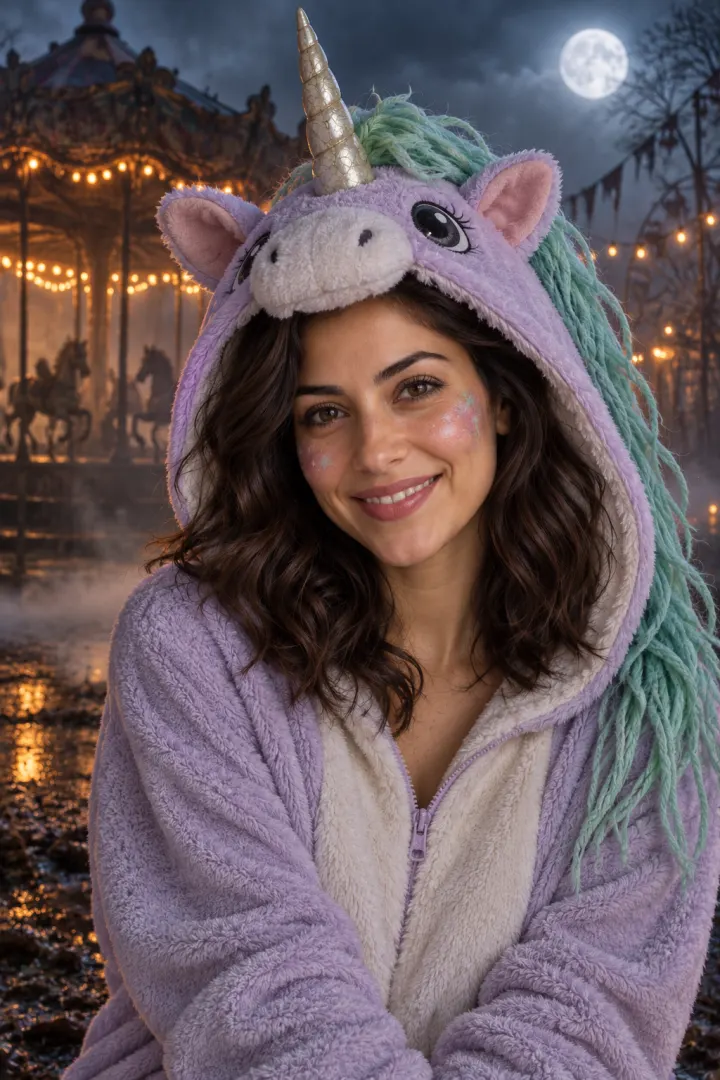
This is a proposed craft design, not a tested physical build. The reference portrait is an AI concept preview; the diagrams explain construction and are not full-size sewing patterns.
The movie character and this original DIY are different looks
In Buddy (2026), Buddy is the orange unicorn host of the fictional children’s show It’s Buddy!, voiced by Keegan-Michael Key. The film turns that cheerful mascot setup into R-rated horror. This guide does not claim to reproduce the movie costume.
Looking for the movie character?
Use the film and distributor pages below as visual references for the orange on-screen mascot. Availability and promotional artwork can vary by country. We do not provide a screen-accurate pattern, licensed costume or replica instructions.
Making the original DIY version?
Continue with the lilac hoodie, soft ivory horn and mint yarn mane below. It is a lighter fan-inspired costume concept designed to keep the face uncovered and to stay clearly separate from the film character.
Want a digital preview first?
Choose Costume Try-On to create an imaginative portrait of the original lilac-and-mint idea. It is an image edit, not a fit measurement, sewing pattern or preview of an official costume.
Materials and a realistic shopping budget
US planning estimate in USD, prepared October 21, 2026: allow about $15–25 for accessories if you already own a hoodie, scissors and basic craft tools. This excludes a new hoodie, tax, shipping, optional upgrades and AI purchases. Most rows are budget allowances, not live retailer quotes.
| Material | Amount and use | Budget allowance |
|---|---|---|
| Lilac hoodie or sweatshirt | 1, already owned; a pale gray top also works | $0 if reused |
| Craft felt | 4 sheets, about 9 × 12 in: ivory horn, lilac ears, mint ear centers and backing | $2 allowance |
| Mint yarn | 1 small skein; cut only as much as your hood needs | $3–6 estimate |
| Fabric glue | 1 bottle suitable for your chosen fabric; test on a scrap first | $7 allowance |
| Wide fabric-covered headband | 1, comfortable enough to carry a light horn and ears | $2–4 estimate |
| Ribbon and soft stuffing | Short ribbon lengths and clean fabric scraps; avoid hard horn cores | $1–3 estimate |
Tools: paper for a mock-up, ruler, fabric scissors, pencil and clips. The reinforced version also needs a needle and matching thread. Use the adhesive maker’s drying and washing instructions; “dry to touch” is not necessarily ready to wear.
Price references, not a checkout quote
Retailer listings consulted for this estimate showed felt sheets from $0.32 and a 4 fl oz fabric glue bottle at $6.99. Colors, sellers, location and availability can change the price. Yarn, headband and ribbon amounts above are planning allowances; check your basket before buying.
Build the look in six steps
Planning allowance: roughly 1–2 hours of active craft work for a beginner, plus the adhesive’s full cure time. This is not a timed build; start before the day you plan to wear it.
Construction references
Schematic shapes, not to scale. Make a paper mock-up and adjust to your headband and hood before cutting fabric.
- 1
Choose the base and mark the placement
Try on the hoodie and headband together. Mark the horn position on the headband and the top center of the hood with removable chalk. Keep the face opening clear. Remove the clothes before cutting or gluing. Start with paper shapes so you can adjust the proportions without wasting felt.
- 2
Make a small, soft horn
Draw a quarter-circle with a radius of about 12 cm on paper. Roll it into a cone and overlap the straight edges by about 1 cm; adjust until the base fits your headband. Use the paper to cut ivory felt. Glue the side seam, lightly fill with soft scraps, and close the bottom with a felt circle traced from the cone. Keep the tip soft; do not add wire or a rigid stick.
- 3
Shape two ears and mount the headband
Cut two lilac teardrop ears about 8 cm tall and two smaller mint inserts, leaving about 1 cm of plain felt at each outer ear’s base. Glue the inserts, pinch each base, and let it set. Position the horn between the ears. Use broad felt backing tabs wrapped around the band, bonded on both sides, to spread the load. Let everything fully cure before checking whether it holds.
- 4
Build the yarn mane on a removable strip
Measure from the crown of the hood down to the neckline. Cut a felt backing strip about 3 cm wide to that length; overlap and bond two short strips if one sheet is too short. Cut a few 30 cm yarn strands first and fold them in half to judge the finished length. Add small bundles along the strip, bonding their folded centers beneath short felt cover tabs. Leave the mane clear of your face and trim any strands that catch on the zipper.
- 5
Attach and choose your level of detail
For the no-sew version, use fabric adhesive to attach the mane strip to a spare hoodie; consider this a permanent alteration. For a removable version, sew the strip to the hood with widely spaced hand stitches that can later be unpicked. Add a loosely wrapped ribbon spiral to the horn if desired. A simple clean palette is enough—skip heavy decorations and loose trailing ties.
- 6
Fit, photograph and adjust
Once the adhesive has fully cured, gently tug each attachment off your body, then try it on. Turn your head, look down, sit and walk. If the horn wobbles, shorten it or enlarge its backing instead of adding weight. Photograph the look in normal room light before trying a darker Halloween backdrop. Keep your actual build photo separate from any AI preview.
Choose how much you want to make
Simple no-sew version
Reuse a hoodie. Make a short felt horn and two ears on a headband, then glue a small mane strip to the hood. No face covering, full mascot head or body suit is needed. The glue may permanently mark the garment.
Reinforced, removable version
Use hand stitches at the horn and ear backing tabs and stitch the mane strip to the hood. Add extra felt at stress points. Test the weight before adding decorative fabric. Optional fabric and sewing supplies are extra; this version takes longer than the basic planning allowance.
Check comfort before the party
- Keep eyes, nose and mouth uncovered. Use lightweight materials and leave room around your neck; avoid full-face mascot heads for this build.
- Keep fabric and yarn away from candles, heaters and open flames. Use battery-powered lighting for a photo corner.
- Remove loose pins and clips after assembly. Keep tools and small offcuts away from children and pets; an adult should handle cutting and adhesives.
- If the headband presses, the horn slips or you feel too warm, remove it and adjust. A photo-ready prop is not automatically comfortable for a whole evening.
Before you start
- Is this the exact Buddy movie costume?
- No. The guide creates an original lilac-and-mint haunted unicorn look. It is not licensed, endorsed or designed as a screen-accurate replica.
- Can I make it without buying a hoodie?
- Yes. Reuse a top you own and keep the horn and ears on a headband. Skip the attached mane if you do not want to alter the garment. Your result will be simpler than the concept image.
- Will AI try-on show exactly what I can sew?
- No. It provides an imaginative image edit, not a garment pattern or fit measurement. The Costume Try-On may add lighting, makeup and background details that are not included in this materials list.
- Can I use the mascot selfie instead?
- Yes, but it is a different result: an original unicorn mascot stands beside you. Choose Costume Try-On when you want to see yourself wearing the outfit.
Upload a photo in the existing generator. AI previews suggest a look; they do not measure garment fit or guarantee the same materials, pose or finish.